For some, the caretaking of houseplants is half the fun. But for those who struggle with watering schedules and fertilizing doses, no-fuss air plants are the way to go. They look beautiful and require almost no maintenance. However, finding planters that are the right size and shape to hold your air plants for best display can be a challenge.
One of the nicest things about air plants is that they require no soil, so there's no need for an ordinary planter. Display options can be as creative as you want, and air-dry clay is the perfect material for this job. It's super easy to work with and is forgiving of mistakes — simply reshape it until it's just right.
Video of the Day
In this project, we elevate the look of plain air-dry clay with a custom paint job and some clear sealer. The results look like traditional handmade pottery!
Video: Air-Dry Clay Plant Pots
Things You'll Need
Wax paper or parchment paper
Air-dry clay
Rolling pin
Ruler
Pottery knife
Cookie cutters
Straw (to make holes)
Sandpaper
Acrylic paint (optional)
Paintbrush (if painting)
Clear sealant, brush-on or spray
String for hanging (as needed)
1. Prepare your workspace
Get your workspace ready by laying down wax paper or parchment paper to prevent the clay from sticking to the surface. The wax paper will also protect your clay from dirt, dust, and other small particles from your workspace.
2. Roll out the clay
Take out a piece of air-dry clay from its packaging and knead it to soften it up. Use a rolling pin to flatten the clay to your desired thickness. You don't want the clay to be super skinny but also not chunky, which would make the planter too heavy. A good thickness for this project is about 1/4 inch.

3. Make some slip
Slip is clay mixed with water. It helps you stick clay pieces together as well as soften hard edges or smooth imperfections, giving your project a polished look. To make slip, combine some air-dried clay and water until the consistency is like heavy cream.
Tip
It's helpful to have some slip ready before you start working on your design, so you'll be able to use it as soon as needed.
4. Create your design
Use tools such as a ruler, knife, and cookie cutters to cut your air-dry planter shapes out of the rolled-out clay.
Get creative with this step and play with different ideas. One simple way to start is by choosing geometric shapes such as rectangles, circles, or squares to create a basic shape that can be manipulated into a pot shape.
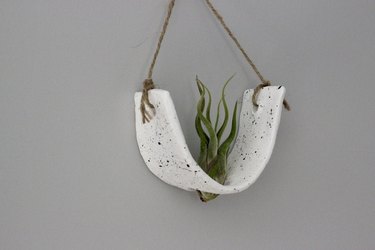
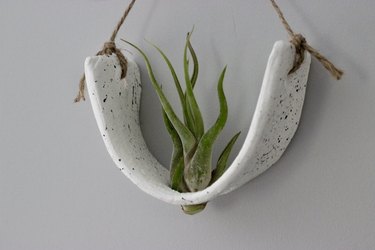
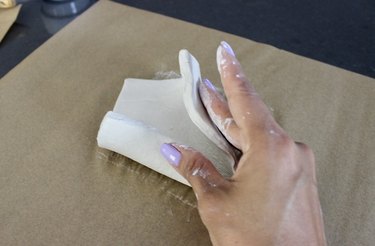
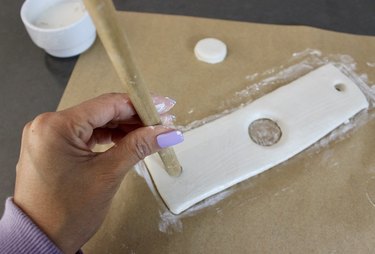
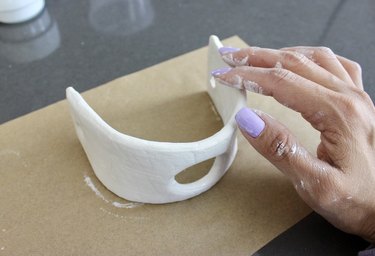
To create a semicircular air plant planter, measure and cut out a rectangle of about 9 x 2 1/2 inches.

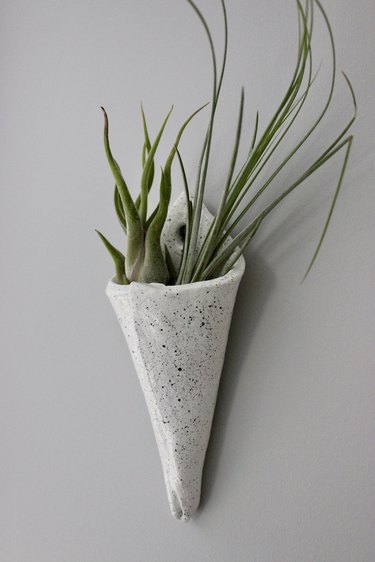
Another idea is to create a conical planter: Start by cutting out a square of about 5 x 5 inches. Bring two opposing sides together to form a shape that looks like a flower bouquet bag. Glue the seam with slip, and smooth the exposed edge for a finished look.
5. Make openings for plants and hanging
Use a thick straw or dowel to create one or more small holes for hanging the planter. To make the semicircular pot as shown, use a cookie cutter to make a bigger hole in the center of the rectangle to hold your air plant.
6. Let the clay dry
Complete any final shaping, then allow the clay to air-dry completely according to the package instructions. This typically takes 24 to 48 hours, depending on the thickness of the clay. Check on the piece periodically, and flip it over a couple of times while drying to prevent warping.
Consider keeping your creation safe in a cupboard for at least the first 12 hours of drying, to protect it from dust and humidity. After that, you can let it dry in a safe and flat area for the rest of the time.
Tip
You can wrap a semicircular planter around the base of a cylindrical plastic container to help retain its shape while it dries. Remove the container once the clay firms up, to aid drying.
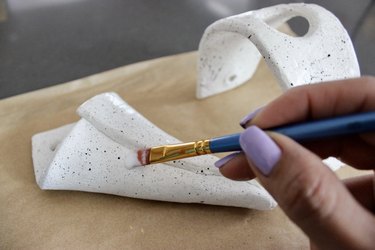
7. Paint and seal the planter
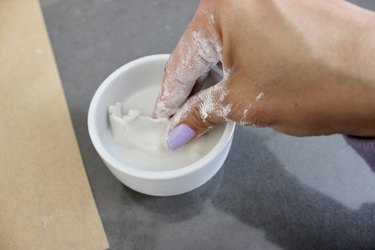
When your piece is completely dry, smooth out any rough edges or uneven surfaces using sandpaper.
As an option, you can use acrylic paint to add some color and texture. For these planters, we dipped a paintbrush into black paint then flicked the bristles with a finger to splatter the clay with little spots. of black paint. You can also use a toothbrush for this effect. It's a good idea to practice first on a sheet of paper.
Let the paint dry completely before sealing the clay.
Apply a clear brush-on or spray sealant to all surfaces of the piece, and let dry as directed.
8. Hang the planter
Tie string to your planter, as needed. Hang the planter from a screw, nail, or picture hanger, as desired. Add a plant or two to complete the project!